Disclaimer: I have bought a lot of BOSS shotshells over the years, but they have also sent me shells for testing and review, including some mentioned and tested here. Also, Carlson’s and Muller have provided me with choke tubes. But none of these companies have ever paid me anything. Many thanks to all of them for their support.

I have long been a fan of BOSS Copper Plated Bismuth shotgun shells for hunting waterfowl. I did maybe the most thorough research and review of the shells on the internet.  So when BOSS announced that they were releasing a new game changing buffered load I was very excited. I was also a little bit skeptical. 

You see, I am a regular hunter who just so happens to have a PhD and a low tolerance for marketing hype trying to help people find out what really works and what doesn’t.

The waterfowl hunting ammunition industry is very competitive, and my testing has shown that often the marketing speaks louder than the results. For anything to be “game changing” it really has to provide significant improvement and innovation. BOSS claimed very directly that their new shells would do that without being significantly more expensive than their original legacy bismuth loads. So, I was ready to put these shells through their paces the moment they became available.

I embarked on a series of pattern tests, ballistics gel tests, choke tests, long range tests, and shell analysis to get the real story. To summarize everything, BOSS delivered on their promise with the new BOSS Warchief shotshells.

What Makes The BOSS Warchief Different?

BOSS saw an opportunity in the market to develop a bismuth shotshell to extend the maximum range of waterfowl hunters well beyond 40 yards. The biggest change put into place with these loads is the use of biodegradable buffering material. The buffering is like a course powder mixed in with the bismuth pellets in the shot cup.

This cushions the pellets when they are fired which keeps the pellets from bouncing around against each other as they leave the barrel, and it is provides support which keeps the pellets on the bottom of the shot column from deforming as they accelerate from 0 to 1,350 feet per second. This results in a much tighter pattern with fewer flyers and fewer broken pellets.

This makes sense to me. The next claim BOSS made did not though. They said the buffering also results in an additional 8% of ballistics gel penetration. The reason is that some of the pellet’s energy is lost in deformation when you pull the trigger and deformed pellets also fly slower due to being less aerodynamic. So, if you buffer the shot, the pellets do not deform, and you gain more ballistics energy.

Now to put this in context, most of BOSS’s competitors use higher velocities, 1450 fps vs BOSS’s 1350 fps. I did a detailed video comparison on the top bismuth shells on the market, and several other videos beyond this one and found that the faster loads had between 2% and 8% more penetration than the BOSS but with much more recoil.  So, this innovation would put BOSS ahead of their competitions in terms of ballistics energy at the target, and with less recoil

BOSS also designed a special wad to use with the Warchief and obtained the equipment to create the wads in house. So, they have engineered the wad to further improve patterns and they are able to add a chemical to the plastic that enables the shot cups to biodegrade in the field after five years. This does not help performance, but it is a huge step in the right direction and will result in less habitat damage. It also gives some piece of mind because most shot cups are left in the field. If you are newer to the waterfowl ammo landscape, here is a podcast episode I did titled: All About Shotguns & Shells For New Duck Hunters.

Warchief Pellets Per Shell

As soon as the new buffered load was announced people began to speculate if the buffer material would count towards the weight of the shot, thus resulting in fewer pellets per shell to make room for the buffer material. BOSS assured people that this would not be the case and they would not sacrifice pellet count. I’ve heard that before, so one of the first things I did was open up a few shells and count the pellets.

I counted the pellets in the #5, #4, and #3/5 legacy shells and then the new Warchief shells, all for the 2.75″ 1.25 oz loadings. In every pellet size, the Warchief shells had more pellets than advertised, and were equal to the non-buffered legacy loads. BOSS not only stuck to their word, but they over delivered by at least a few pellets in every shell. Being one the few companies out there that give you more than you pay for, in an industry plagued with corner cutting. 
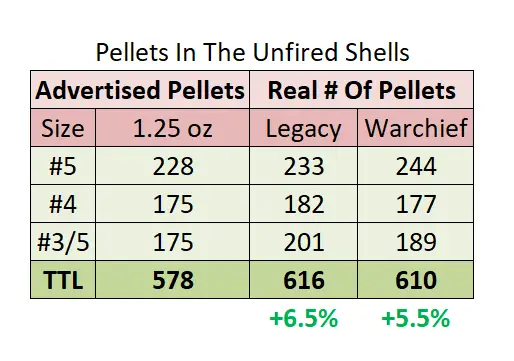
Pellet Data For Boss Legacy vs. Warchief Shells

BOSS Legacy vs. Warchief Testing

The next step was to take the new shells to range and test them against their equivalent legacy shells to see if we can find any significant improvement in performance. So for the first round of testing, I patterned the legacy shells #5, #4, and #3/5 against the same size Warchief shells. That was a really awesome test and you can watch the entire thing right here:

In short, the Warchief shells did better across the board, resulting in an average 22% increase in pattern density. That is massive. With the Carlson’s Bismuth Bone Buster extended range choke tube that I tested, I got an average pattern efficiency of 89% across all three shot sizes with the Warchief, vs. 74% with the original legacy shells. The impact of this is big, and I’ll talk more about it when I get to the long-range testing.
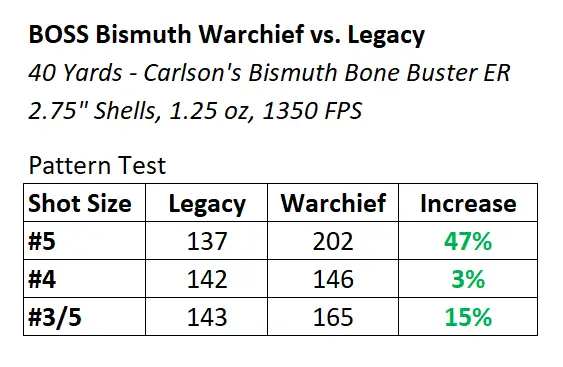
Pattern Data for Boss Warchief vs. Legacy Shells

When it came to ballistics gel penetration, I tested the legacy #4 against the Warchief #4 and the new shells came out ahead with an extra 7.8% more ballistics gel penetration, almost exactly what BOSS promised. I was more than a little impressed when I ran the math. The Warchief performed very well in every test I did. But the shells did even more impressively when I began the second round of testing.

Warchief Choke & Pattern Testing

The next thing to do was test the Warchief through a variety of chokes and choke constrictions to find what works best with it. So I ran it through 9 different choke tubes, and counted over 1,500 pellets to try and find the best combination. To make a long story and awesome video short, the tighter the constriction, the better it performed. You can check out that video right here:

I do not want to spoil the entire video, but I was able to find a choke tube that gave me 101% pattern efficiency. Now that shouldn’t be possible, but like I said earlier, BOSS packs a few bonus pellets into these shells so I was able to get more pellets in a 30″ circle at 40 yards than are advertised as being in the shells. Those are some tight patterns!

Then came the long-range testing. And suffice to say, with 101% pattern efficiency at 40 yards, I was still able to get enough pellets on paper to kill a duck at 60 yards. The ballistics gel penetration at that range was also sufficient! That video and the exact details are coming some. Be sure to follow me on YouTube to know when it launches.

2.75″ vs. 3″ Shells

As of this writing, the Warchief only comes in two options for 12-gauge shotguns, the 1.25 oz in 2.75″ in shells and the 1.5 oz in 3″ shells. Stepping up to the larger 3″ shells gives you 20% more pellets but it comes at the cost of 5% more cash and about 30% more recoil. And that recoil increase is very significant. I was able to shoot the 2.75″ shells effortlessly, but the 3″ packed a much more noticeable wallop on the shoulder. 

Which of the two loadings is best will depend on you, your hunting style, and how much you plan to shoot. For most average hunters going afield in normal conditions with the expectation of shooting decoying birds, the 2.75″ shells are all you could ever want. There is no reason to use the 3″ shells, you cannot kill the birds any deader than what the shorter shells can do.

For hunting late season geese with #2s, jumping hunting birds from afar, or long-range pass shooting, you will be able to make use of the extra shot the 3″ shells give you, and you will likely be shooting less which makes it a bit easier on the shoulder. But honestly, the patterns are so efficient that the 2.75″ shells are putting more pellets in the 30″ circle than many other 3″ shells. They are very potent. Very few wasted pellets. 

Competitors & Pricing

I hate listing prices because they can change so fast as the season comes and goes but when I wrote this, here are real market prices from mainstream retailers on the top bismuth loads on the market, these are for 3″, as close to 1.5oz as possible. 

  • HEVI Bismuth = $2.12
  • Winchester Bismuth = $2.40
  • Kent Bismuth = $2.60
  • BOSS Warchief = $2.14 (Program members pay $1.68)

The retail price for BOSS Warchief puts it on the lower end of the bismuth price spectrum. And its patterning and ballistics performance is equal to or better than all the competitors, and it boasts nontoxic buffer material with the biodegrading wad at no extra cost, along with copper plated shot. However, for BOSS Program members, the cost for the Warchief is drastically lower and puts it at the lowest on the market by a wide margin.

The BOSS VIP Program is their customer loyalty initiative. Program members pay an annual fee to join and get discounts on shells ordered, free shells of their choice, new products in development for testing, swag, exclusive access to sales and restocked items, and numerous other benefits. There is a significant sunk cost but program members who buy a lot of shells report the program typically pays for itself very fast while providing all the other benefits. I am a paying program member myself.

Conclusions & Recommendations

The BOSS Warchief is a game changer for long range waterfowl hunting. For the price, they are the most effective shell on the market and provide outstanding performance while leaving biodegrading buffer material and shot cups in the woods that will utterly vanish. Being able to get 100% patterns at will is unbelievable, and having more penetration with less recoil than the competition is a huge bonus as well. Check out the new BOSS Warcheif shotshells for yourself. As a note, BOSS sent me these shells at my request to do this review, and Carlson’s sent me the choke tube, thanks to them for their support.

Be sure to listen to The New Hunters Guide Podcast and check us out on YouTube

Till next time. God bless you, and go get em in the woods!

George Konetes Ph.D. – Founder and Host of the New Hunters Guide.

The New Hunters Guide is simply what George wishes he would have had when learning how to hunt; a single place to get practical hands on knowledge about different kinds of hunting, gear, strategy, and tips that can improve your comfort and fun factor in the woods.

Duck decoys range from $40 to $400 a dozen, and beyond. Are the fancy duck decoys better? If so, by how much? On this episode I talk about the differences between cheap and expensive duck hunting decoys to help you understand how to weigh the pros and cons of each to make informed decisions. 

Keep in mind, for generations hunters carved crude decoys from wood, used painted milk jugs, and improvised their own decoys out of whatever rudimentary materials that could find or create that would float for awhile. And these decoys worked reasonably well. Even the cheapest decoys on the market today are drastically better than what most hunters used throughout waterfowl hunting history. We are a little bit spoiled today with the caliber of simple and low-cost options available. So, are expensive decoys really that much better?

There are three main areas that expensive decoys give you advantages over cheaper decoys. They are detail, durability, and technology.

  1. Detail refers to both the paint job and the life like diversity of different duck positions. Cheaper decoys often all look identical while more expensive ones have a variety of posses that make them appear more lifelike.
  2. Durability is a factor of two different areas. One is making the decoys sink resistant and the other is the durability of the paint and finish. Only one of these is a legitimate point to consider when it comes to cheap vs. expensive decoys.
  3. Technology is a bit more complex. Because ducks can see certain colors and spectrums that people cannot, some decoys are designed to be more visible to ducks in low light but people cannot see those differences with our eyes. Expensive decoys sometimes come setup with this technology.

The big question is how much difference can expensive decoys make in these areas to be worth their price tag? Are $400 decoys really 10x better than $40 decoys? The simple answer is no, of course not. The more you pay, the less you get. It is a system of diminishing returns. However, if you pay more, you do get more. You just do not get a lot more. So the hunter able to pay large sums of money for the best decoys does get better decoys but they are only a little bit better. 

So, is it worth it? Only you can decide that. You need to listen to this entire podcast episode to get all of the information you need to judge the pros and cons of expensive decoys and decide which decoys are best for you to use.

The best weather conditions for buck movement vary as the hunting season goes on. Weather, time of day, and time of season all work together to create ideal situations for whitetails to move. On this episode I focus on the weather and seasonal conditions that promote deer movement. 

Too often deer hunters go into the woods and see nothing. Any good hunt starts with good scouting, and indeed that has been the subject of many of my previous deer hunting episodes. But if you have a good spot and still see nothing, that may very well be a factor of being there on poor weather days that inhibit deer movement. Understanding this little piece of information can completely change the way you hunt and how effective you are in the woods. 

There are three main factors that work together to determine ideal times for buck movement. Time of season, weather conditions, and relative temperature. Think about it, deer live outside, and they like to move and feed under certain conditions. If you can learn the basics of each factor, you can put them together to predict the best hunting days with fairly good accuracy.

Time of Season – Deer movement patterns change as the season goes on. This is affected by how deer relate to the mating season, the change in weather, and change in habitat as soft cover dies with frost and things change as winter approaches.

Weather Conditions – Deer are greatly affected by changing weather conditions. They are no less sensitive to the weather than we are. Understanding how weather effects deer behavior will enable you to predict which weather days are the best for deer hunting. 

Relative Temperature – As fall comes and deer begin to grow in thicker fur, they are much more sensitive to high temperatures. When it is hot, they are much less likely to move until the colder times of day. But when colder days comes, the crisp temperatures can be liberating to big bucks, freeing them from overheating to move around more during daylight. 

The big key to picking the best days to hunt deer are putting these three factors together. Understanding the right time of day based on the part of the season you are in, picking days with the ideal changes in relative temperature, and looking for specific micro weather conditions that best contribute to deer movement. 

You can take deer on any day of the hunting season, at any time of day, and during any weather conditions. But your chances increase dramatically if you pick the best days and conditions. And if your time to hunt is limited, this information can help you pick the best possible days for deer movement.

Listen to the full podcast episode to get all of the information!

There is no shortage of companies trying to convince deer hunters that they will take more deer if they buy something. The marketing is so overt and overwhelming that you could easily think you can spend your way to success in the woods. The truth is, there are precious few things you can buy that will make any difference in the number of deer you take. On this podcast episode I help you sort through the tide of marketing so you can make informed purchase decisions.

You can break down most deer hunting gear into three main categories, needs, comforts, and novelties.

There are very few true needs for the whitetail deer hunter. I consider a need to be anything you must have to optimize your chances of success for your hunting setup. If you are hunting in a tree, you need a tree stand. If you are hunting in archery season, you need clothing that provides some level of concealment to get in close, etc. What you do not need is a $500 tree stand or a $1,000 set of super high end camouflage gear. Needs are basic boxes that need checked to hunt a certain way, and it is a short list of boxes. A $100 tree stand fills the role of a need, a $500 tree stand is merely adding comfort, it may be nice but it will not help you take more deer.

Many companies try to market comforts as needs. And it is no wonder why, they want you to feel compelled to buy their stuff. But if you recognize comforts what for they truly are, you will make much better decisions. Comforts do not really help you take more deer, they simply make hunting more comfortable. In some rare cases they can help you take more deer by virtue of enabling you to keep hunting under conditions that would have sent you home otherwise. This is worthy of mention.

Often a full set of Sitka Gear is just going to make the hunt more comfortable and ergonomic, except when extreme cold, wind, or rain would send you home and insulated GORTEX lets you stay a few more hours and get a shot at a nice buck. So in some instances, comforts can make a difference in the field. Most of the time the $2,000 rifle cannot do anything more than the $400 rifle, but it is more ergonomic and fun to shoot. However sometimes the cheap rifle scope fogs up when you need it and the high performance one does not. So, every now and then spending the money matters, but often it just makes hunting a little nicer.

Novelties include just about everything else from things that have some value to thing that are complete gimmicks. On the market there are endless calls, scents, scent blockers, scent killers, scent proof clothing, special knives, special drag ropes, special bait, special laundry detergent, and much more. These are things that sometimes may help, sometimes they do nothing, and sometimes they hurt.  Yes, it can be helpful sometimes to have grunt call, but usually it makes no difference. No, you should not wash your gear in scented detergent, but to spend double on hunting laundry detergent that is the same as the regular stuff minus the added scent is a product of sheer marketing.

No matter the gear in question, always remember the marketing will paint it in the best light possible. You have to realistically evaluate everything with a healthy dose of skepticism. Look at the functional role a piece of gear will play and critically evaluate why you think it might somehow enable you to take more deer.

Listen to this podcast episode to hear much, much more.

It is easy to get stuck in one approach to deer hunting and simply stick with the strategy that has worked for you in the past. Being a well-rounded whitetail hunter is a noble cause but there are practical benefits to being proficient in different strategies. On this episode I talk about how to make the most of every hunting opportunity by looking at four different ways to hunt deer and when to do each. 

Ambush Hunting

Many whitetail deer hunting strategies can be grouped under ambush hunting. Using one method or another, you are laying in wait, as inconspicuous as possible, ready for a deer to walk into a shooting lane for you to ambush it. This is done with rifle hunting, archery, shotgun, and just about everything else. Ambush hunting can be broken down into two main types, the prepared ambush and the improvised ambush.

Prepared Ambush

This involves scouting, land management, advanced planning, and everything that goes into selecting a hunting location in advance. Whether you spend a day or a year preparing to hunt from a particular spot, it is a preselected ambush location, possibly a tree stand, ground blind, or some other type of concealment strategy, if not just leaning up against a tree. This is sometimes done well on public land, but it is most often going to be private land where you can control hunting pressure and habitat to some degree.

Improvised Ambush

The improvised ambush involves going afield, looking for sign or a good location, and setting up to ambush deer that you believe will come through that spot. The location is not preplanned, and you are selecting it based on sign you find in the field right now. This is most often done on public land or large tracts of private land where you do not as much control over the habitat or hunting pressure.

Active Hunting

Active hunting is the other major category for hunting whitetails. This involves the hunter being on the move and trying to put yourself within firing range of a deer. There are two primary types of active hunting I discuss in this episode, still hunting and strategic location hunting. 

Still Hunting

Still hunting is a type of active hunting that involves walking through the woods slowly, trying to catch deer unaware. It takes a lot of skill to do well, and perfect conditions to do great. But this is still an effective strategy for people of all experience levels. It works particularly well when there are other hunters in the woods pushing deer around. It is most often done on public lands but may also be done on large pieces of private land.

Strategic Locations

This form of active hunting involves stealthily slipping from one high potential area or another, sneaking to a vantage point from which you hope to be able to get a shot at deer. These could be a series of locations with various draws for deer like feeding areas, water, bedding, browsing areas, etc. This is most often done on public land but it can be very effective on private land as well, if you do not overdo it and spook out the deer. 

Listen to the whole podcast episode for all the details and when to use each strategy. 

To hunt black bears you have to find them. This type of hunting is a little different than deer or turkey hunting, scouting matters ALOT more. Bears are not as prevalent as other game and just because an area looks good for bears does not mean that they live there or are anywhere close. You must put in the time to find them before the season starts to maximize you chances of success ,and on this podcast episode I am going to help you learn how to do just that! 

Scouting for black bears requires some time investment but strategy matters even more. Bears need to eat and they love to hide, so the first thing you want to do is identify potential food sources that are likely to attract bears. Keep in mind these change depending on the season and regions you are hunting. Good food today may not be good food next week.

Then you want to find these kinds of food sources within reasonable proximity to heavy dense cover that the bears can disappear in. If you can locate these two things then you have the key variables needed to justify some scouting, NOT HUNTING. These findings are not enough to warrant a hunt, they are only sufficient to justify scouting. Many of these types of areas will hold no bears. You need to go there and scout first, before you hunt.

4 Strategies for Black Bear Scouting

Bear tracks are the simplest and most straight forward sign you will find but they are not as prevalent as you might think. Bears are big heavy animals, but they have very large paws, with much more surface area than the points of a deer foot. They will only leave tracks if the ground is very soft, wet, or muddy. Bear tracks are only about 10% of the sign that you are likely to find. However, you can learn a lot about the size of a bear and how recently it was in the area based on the tracks.

Bear droppings are more prevalent. These are big animals that eat a lot and leave a lot of droppings. If bears are around, you should be able to find bear droppings for sure. With just a little bit of research you can also determine the approximate diet of the bears based on their droppings. And if you can learn what they are eating you can also determine what food sources to find and camp out around. This is a great strategic win that can really help you.

Bear activity can include tearing up berry bushes, ripping up tree bark, breaking open fallen logs, flipping over rocks, and much more, all in search of soft plants, tree bark, honey, ants, or other forms of nutrients. Bears are not subtle, and can leave a wake of disruption and destruction. If you keep your eyes open, you should easily be able to tell the relative size and recency of such activity if you come across it.

Bear bedding areas are hard to find and search because they are so dense and thick. Rather than try to get into the bedding areas, likely leaving scent that spooks the bears out of them, you should focus on identifying areas with ideal bedding spots. This are very dense, cool, dark places that the bears can retreat to and disappear. If you do stumble into a bedding area, one of the clearest signs will usually be some bear fur left behind on the ground. 

Listen to this podcast episode for much more detail and information on how to scout for black bears!

Do you want to take more game home? On this episode I am going to cover the single most important thing you can do to improve your hunting success rate. In short, I am talking about practice, specifically sporting clays practice, thought trap shooting and skeet can be helpful as well. This is mainly for shotgun hunters but there is also some application for rifle hunters as well. No gear you can buy will help you more than realistic practice. Skills will always trump equipment. 

In my experience, the average wing shooter takes home about 30% of the birds they shoot at. Some are better, some are worse. A better shotgun will not do much to improve this. Better ammo will only do so much. Better base layers, camouflage, gloves, calls, etc, will do almost nothing to help this average. The single biggest thing that will help is practice. And that just so happens to be the single most overlooked thing that hunters do and spend money on…

If you want to take more game, you need to practice more. That involves trap shooting, skeet shooting, and most importantly sporting clays shooting. All center around shooting at a clay disc out of the air, often referred to as a clay pigeon. These clay targets can be easily purchased at many big box stores for somewhere around $10 per 100. 

  • Trap Shooting involves clay targets that are launched away from the shooter at various angles to simulate a bird flushing and flying away. It gets its name from historical practice that was once done when the shooter would call “pull” and someone would pull the pin holding the trap door shut on a cage and thus allowing real birds to flush away from the cage as target practice.
  • Skeet Shooting essentially involves firing at clay targets passing or crossing in front of the shooter, similar to real birds passing by or being flushed by a dog or another party. The name “skeet” is believed to come from the Norwegian word “skyte” which means “shoot.”
  • Sporting Clays has some similarities to golf as it is a multi-position or hole course. No two courses are identical and often contain 20 positions with a total of 100 clay targets on a full course. Each position features multiple clays launched from various angles, and directions, all unique, simulating a wide range of real-world hunting situations from ducks to pheasants, grouse, doves, and many more.

Each sport is great fun and has great value. But I do believe that sporting clays provides the best hunting practice out there. And the variety of courses adds great realism and infinite shooting possibilities to simulate real hunting conditions.

Typically sporting clays courses cost between $40-$75 for a full 20 position course with 100 clay targets, plus the cost of ammunition. So realistically, you are looking at around $100 per outing. This is not cheap, but neither are the many highly marketed products that hunters pour money into every year for minimal benefit. 

I would recommend you toss $10 a paycheck into your sporting clays jar and go practice 2-3 times a year to start. The skills you gain will be valuable for a lifetime, and even if they dull some over time, picking it back up is a lot like riding a bicycle. This will do more to improve your percentage of shots fired to birds taken home than anything else you can spend money on. 

Get out there and get some practice. Listen to the full podcast episode for more!

Hunting rabbits is a fun and challenging pursuit that is great for hunters of all ages, and it provides an opportunity to hone skills that you will use for other types of hunting. On this episode I talk about how to find rabbits along with the guns, ammo, tools, strategies, and info you need to get out there and be successful in the woods.

Like hunting anything else, rabbits require certain core fundamentals:

Finding Rabbits

Scouting is the first priority. To hunt rabbits you need to find them. A nuance with rabbits is not just finding them, but finding a location where they live and are huntable. Since they are small ground animals, you need low brush and good visibility to be able to take one.

So you need to identify rabbit habitat, food sources, cover sources, and open areas for hunting. Even large hairs can easily disappear in grass or brush that is just a foot tall. Realistically you want to be able to see the ground to hunt them effectively. 

Strategies

Rabbits are primarily hunted with a few strategies like sniping, walking and spotting, walking and flushing, and with dogs.  There is no right or wrong way to do it. It depends both on your preferences and on the rabbit habitat available to you.

But contrary to popular belief, you absolutely can hunt rabbits successfully without a dog, A dog can help and make certain things easier, but unless they are well trained, they can also be a liability. 

Firearms

The ideal weapons for rabbit hunting are a shotgun or rimfire rifle. People tend to debate if it should be a 12-gauge or 20-gauge shotgun. The truth is, you can load both shotguns to similar specifications for rabbit hunting, it makes little difference. Use whatever shotgun you have handy and focus on getting ideal loads for rabbit hunting.

Almost any rimfire rifle can also work. The 22 L.R. is the most common and works great, but you can use almost anything, just be mindful that you use loads that are not overpowered. Your average high velocity 22lr ammo is going be just fine. Ultra-high velocity is overkill, as are heavily loaded 22 magnum rounds. 

Ammo

The main caution for rabbit hunting is to keep from using ammo that is overpowered. It can be easy to overly damage the meat at close to mid-range. It is also easy to spend way more money than you need. Light loads are often all you need. I recommend #7.5, #7, or #6 lead shot for rabbits. Often 1 to 1 1/8 ounce of shot traveling around 1100-1200 fps. That is all you need.

For 22 L.R. I think something similar to a 40-grain hollow point traveling at 1200 fps is plenty. There are rabbits after all, not coyotes. Higher power magnum loads are fine, but only necessary if you are taking long range shots. They can cause too much damage at 10 yards, but at 100 yards, they can be just fine. Knowing where you plan to hunt can help you make the best ammo decisions.  Even subsonic bullets can be enough, here is a video I did on the subject:

Cleaning & Cooking

How you clean and cook a rabbit is less important than having a plan to do so. Spend some time watching videos and reading articles on field dressing and cooking rabbits.  This way, when you bring home your first limit of rabbits, you will have an idea of what to do next.

This little step helps keep you from wasting game because you are not sure what to do and thus never get around to doing anything. Just having a plan can do a lot to help you take the next steps well.

Listen to the podcast episode to hear much more detail about how beginners can start rabbit hunting! 

Squirrel hunt is fun, the season is long, and there are many ways to go after these little critters. On this episode I talk about how you can get started hunting squirrels. This is a beginners guide to start squirrel hunting. 

Support the show on Patreon.

How can you start squirrel hunting?

The first thing you should do is figure out what you are going to do with the squirrels that you take. Read, study, and think first about how to dress, skin, store, and cook your game. You do not need to spend hours doing this but have a basic plan so nothing goes to waste when you do bring your first limit of squirrels home.

How do you find squirrels to hunt?

Sometimes it seems like squirrels are everywhere when you are hunting deer, turkey, and ducks. And that is for two main reasons. Those animals tend to be drawn to things that squirrels like, so there is overlap in habitat. Second, when you sit for half a day or a whole day motionless in one spot waiting for a deer, its common to see and notice a couple squirrels, but people rarely hunt that long and patiently for squirrels. So they go to the same spots hunting squirrels and it seems like there are none there, but the truth is, they are not just hunting as patiently.

To find squirrels you most typically are looking for large mast producing trees. Acorns, chestnuts, walnuts, almost any kind of mast or nut that falls from a tree will attract squirrels. The more trees and the older the trees the better. The squirrels will then spend their days looking for food, burying food, and digging food up.

How do you hunt squirrels?

There are two main strategies. First, go into an ideal location and sit down for an hour or two and wait for squirrels to move around. You hunt with your ears first and eyes second. The other strategy is essentially still hunting, walking slowly and quietly through the woods looking for movement in the trees.

What is the best time of day to hunt squirrels?

Typically the first two hours of the day are best, and the last two hours are second best. But squirrels move all day long and its possible to hunt them at all hours. But a sunrise hunt is most ideal. However, squirrels can move even more right after a big rain storm ends, it is also easier to move quietly at this time. But you also won’t hear the squirrels much because they will make less noise on the wet ground as well.

What is the best gun to hunt squirrels with?

People typically use rimfire rifles like a .22 LR or shotguns. Either work great but I much prefer shotguns due to safety. Firing a rifle into the air is very risky. Even a .22 Long Rifle bullet can travel a quarter of a mile or more. If you hunt with a rifle make sure you are able to shoot into a hillside or other safe area.

If using a shotgun, almost any shotgun will work. Squirrels are not hard animals to take. Light loads that are #7.5 shot or #6 shot are most typical, be it with a .410, a 12 gauge or anything in between. Cheap ammo is ideal to help keep the cost down. High velocity is not needed because you are not shooting birds in the air, these are relatively stationary targets. The best advice I can give is hunt with what you practice with. 

What is the most important element to hunting squirrels? Safety and stealth, hands down. 

Listen to the whole podcast episode to learn how to hunt squirrels! 

Disclaimer: I bought these base layers with my own money though I did use a discount provided by First Lite for industry professionals, they have also provided me with other gear, and I earn from qualifying purchases using links to their site, thanks to them for their support. 

I have accumulated and worn a lot of base layers from synthetics to merino wool and I think the First Like Kiln 250 is the single best base layer I have ever used. I have some heavier base layers and some lighter ones, all of which have their place when they are the ideal choice for that day. But the Kiln is the most versatile and usable on the most days under the most conditions, making it perhaps the most important and thus best base layer in my collection.

I have hunted with the Kiln Crew and Kiln Long John across multiple seasons. I have use them on cold days, warm days, dry days, and wet days. Hunts where I sat still in a blind the entire time, and hunts where I was on the move most of the day. I have worn them to camp and lived in them almost nonstop for three straight days and nights. I ate, drank, cooked, cleaned, slept, and hunted in them for days. All that to say, I have done far more than just try them on at a store and then presume to do a review on them. I have put some real miles on my set of Kiln’s and I am here to tell you all the details. 

Let me just start by saying that this review is not sponsored by First Lite. I bought these with my own money, because I wanted to, though I did use a discount provided by First Lite as a member of their industry professionals program and I earn through I earn from qualifying purchases using links to their site, thanks to them for their support. 

Why The Kiln?

The longer I hunt, the bigger a fan I become of merino wool for most base layers, (more about that later), and I eventually ended up getting the First Lite Furnace 350 for ultra cold weather hunting. I did a full review on the Furnace 350 as well. I really liked the Furnace a lot, but I wished I had something lighter that I could use in more typical hunting conditions. The Kiln 250 is exactly that. 

So about a year after I purchased the Furnace, I bought the First Lite Kiln also, with my own money, though I did use a discount provided by First Lite for industry professionals and I earn through I earn from qualifying purchases using links to their site, thanks to them for their support. I have similar weight synthetic base layers from high dollar brands as well, but I wanted the Kiln because it is merino wool and I find First Lite is leading the industry for merino wool hunting gear in most areas. I find the Kiln is good for just about all hunting between 30-60 degrees Fahrenheit.  First Lite rates it at being capable down a few degrees colder than that and it is, if you are moving.

But I should note that this base layer is not very bulky, and it can be worn with another layer over top of it, even the First Lite Furnace. If it is cold enough and you are sitting still, you could easily wear the Kiln 250 with the Furnace 350 over top as a mid-layer, and I have indeed done it. That totals 600 g/cc of merino wool, and it’s still not bulky enough to cause any hindrance. 

But where the Kiln shines brightest is as an all-purpose all weather merino base layer. That is why I wanted it, and it performs that role exceptionally well. And it pairs exceptionally well with the versatile First Lite Source Jacket I reviewed.  

Merino Wool Overview

Merino wool isn’t magic, it is just an ideal material for base layers. It is simply the wool of the merino sheep. But God designed these sheep with wool perfectly adapted to their needs. This wool has finer fibers than most common wool. This gives it several unique advantages:

  1. The finer fibers make merino wool less itchy, so it can comfortably be worn as a base layer. Regular wool is not comfortable enough to be worn next to skin in most cases.
  2. These fibers enable the wool to take up less volume for the same amount of weight. Which means a 250 weight garment can be thin enough for an ideal base layer whereas a shirt of similar weight regular wool would be more akin to a sweater. So you get the same amount of warmth that bulkier wool would provide but in a much smaller package. 
  3. The fine fibers also enable merino wool to wick moisture away and evaporate it faster than regular wool which tends to hold on to moisture. This enables these base layers to dry much faster.

Like all wool, merino is also odor resistant due to anti-microbial properties. In short it is less prone to stink during a long hunt, weekend, or over the course of years, where synthetic layers are more likely to pick up odors over their service life.

Wool is also thermally regulating, which means it helps you remain comfortable across a wide range of temperatures. These sheep were designed to stay warm on fridged nights while not overheating on warm days.

And like all wool, merino retains the majority of its insulative properties when wet, so it keeps you warmer even if you get saturated. Here is a video I did going into a little bit more depth on merino wool.

Features & Specs

Merino Benefits – The Kiln is essentially First Lite’s merino wool flagship garment. They leverage all the benefits of merino that I just spoke about to create the best base layer possible. It is warm, even when wet, thermally regulating, good for sitting or hiking, fast drying, and substantial enough to help you weather significant cold without adding bulk. It is the best-case scenario of all the merino wool base layers I have owned and seen.

Composition & Comforts – These are 95% merino wool and 5% spandex. You are getting what you pay for, unlike with some other brands that are only half wool for the same cost. But not all merino is created equal. The way these are woven and built makes them the most comfortable merino garments I’ve ever seen. They fit so nicely, so soft, they feel like they disappear after you put them on and get outside, despite being so substantial. 

Weight & Durability – These are both 250 weight merino, which means the weight of the fabric is 250 grams per square meter.  So for every square yard of fabric, you have around half a pound of weight. The First Like Kiln Crew weighs in at 12 ounces, and the First Lite Kiln Long John is about 10 ounces. These things are pretty durable also. They are less delicate than I was expecting for something so soft. I would not wear them as an outer layer, but mine are showing no signs of wear yet at all. 

Colors, Camo Patterns, & Versions – First Lites makes the Kiln in a variety of solid colors and camouflage patterns. You pay a little more for the patterns, but some, like the Typha look amazing. I went with conifer green to save a few dollars, but the new Tera brown looks way better. They also come as a crew, quarter zip, and hoody. I went with the crew because it seems the most intuitive for a true base layer with nothing to get in your way. But you do you. 

Fit & Mobility – I wear a large in pretty much everything and got a large in these and they fit perfect. Plenty of room, but not too loose either. I am a big fan of the fit. I don’t like skintight base layers, and these would easily let me wear another layer under them if I wanted. I am also able to wear another layer over them. So, I call the fit perfect. The range and ease of movement is perfect. And they do not bunch up or put strain around your knees or elbows. 

For more context about how to get the right kind of gear to stay warm in the woods, check out my podcast episode: Making Sense Of Insulation For Hunting Gear.

Pros

  • Very warm, even when wet
  • Fast drying
  • Durable
  • Easy to wash and care for
  • Odor resistant
  • Perfectly sized and comfortable fit
  • Great color options
  • Does not limit mobility
  • Super quiet

Cons

  • Expensive
  • May have the sheepy smell when new, before washing
  • Do not place them in the dryer!

Care Tips

Like all merino wool gear, there is a good chance that not all of the natural oils of the wool are cleaned out thoroughly during the production process. Which means, when the garments get wet they might have a sheepy smell. This could range from barely noticeable to terrible. I was startled and confused the first time this happened to me. But it is normal, I even asked First Lite about it.

All you need to do is wash the layers, dry them, use them, and repeat. I washed them maybe 3-4 times in a row and got most of the smell out of them. Then after using and washing them a few more times, it was essentially completely gone. I have had some base layers where the bottoms were completely fine, and the top smelled really bad when wet. It is unpredictable. But all you need to do is wash them, use them, and wash them.

Caring for these is easy, wash them on cold with a mild soap and hang them up to dry. And that is it. Very easy. They hold up to washing really well too, do not hesitate to do it. Just do not put them in the drier or they will likely shrink on you. In the off season they say you can better protect them from moths by placing them in an airtight container. I have not yet done that and haven’t had any issues for a few years running now.  

Are They Worth The Money?

Is the First Lite Kiln worth what they cost? As someone who has owned dozens of cheaper base layers and never been satisfied with any of them, I am going to say yes. Let’s be realistic though, a full set of these is about $200. That is not cheap at all. They are among the most expensive base layers out there. But yea, I think they are worth it.

It took me about 5 years to buy other more important gear before it made sense to save up and buy these. These should not be your first base layer ever, you likely need to save your funds for other bigger hunting priorities, but eventually I think it is worth finding a place for these in your budget. I may eventually get a second pair in other colors just to wear them more when not hunting. I am very happy I have them.

Conclusion & Recommendation

Overall, I think the First Like Kiln Crew and the First Lite Kiln Long John are some of the best base layers money can buy. They are everything I wanted them to be.  They are great for hunting, hiking, and camping. Probably my first choice in base layers. They are useful for so many things in so many conditions that I think they are the best layer I have for all around use. Check out the Kiln and watch for sales. You can find them on sale a couple times a year. 

Be sure to listen to The New Hunters Guide Podcast, and check us out on YouTube

Till next time. God bless you, and go get em in the woods!

George Konetes Ph.D. – Founder and Host of the New Hunters Guide.

The New Hunters Guide is simply what George wishes he would have had when learning how to hunt; a single place to get practical hands on knowledge about different kinds of hunting, gear, strategy, and tips that can improve your comfort and fun factor in the woods.